how to use Leverage Proposals
How to use Leverage Proposals: a step-by-step guide for Upwork freelancers.
This walkthrough shows how Leverage Proposals turns Upwork searching, proposal writing, review, submission decisions, and reporting into one operating system for freelancers who want better proposal output without living inside the job feed.
Quick answer
Leverage Proposals helps Upwork freelancers create focused campaigns, scan filtered Upwork searches, score jobs, generate proposal drafts, review or automate submissions, and track proposal performance. Use Selective mode when you want semi-automated review control, and use Automatic mode only after your search rules, proposal context, and Connects economics are proven.
What Leverage Proposals does
Leverage Proposals is Upwork workflow software for freelancers who already understand that proposal work is a business process. The product is not just a cover letter generator. It connects the steps that usually live in separate places: Upwork search tabs, saved searches, job notes, proposal drafts, Connects math, client quality checks, submission queues, and performance tracking.
The core idea is simple. You create a campaign around a specific service and filtered Upwork search. The system brings jobs into the dashboard, scores them, organizes them by status, and helps you decide what should happen next. In Selective mode, you review qualified jobs, generate proposal drafts when you choose, edit the draft, and then queue or submit. In Automatic mode, a proven campaign can take on more of the repetitive workflow once your rules and context are strong enough.
That distinction matters. Many freelancers want automation, but they do not want to sound automated. Leverage Proposals is designed around the idea that speed should support judgment. A strong freelancer should still know why a job is worth applying to, what proof belongs in the proposal, and whether the Connects spend makes sense.
- Campaigns organize your Upwork searches by service, niche, or client type.
- Job scoring helps you review better-fit opportunities first.
- Proposal drafts are created from job context and your campaign focus.
- Selective mode gives you semi-automated review control.
- Automatic mode gives proven campaigns a more fully automated path.
- Analytics and reports help you understand proposal volume, spend, replies, and ROI.
Who should use it
The best user is an Upwork freelancer or small agency that already has a service worth selling. If you are still trying to choose a niche, build your first sample, or understand how Upwork works, start with profile and proposal fundamentals first. Leverage Proposals becomes most useful when you already have proof and the bottleneck is consistency, speed, filtering, or tracking.
A freelancer making at least $1,000 per month from Upwork is usually in the right zone. At that stage, a $50-$100 monthly tool can make sense if it saves time, prevents wasted Connects, improves reply rate, or helps win one additional qualified client. The product is especially useful when you apply every week, have multiple saved searches, or want a cleaner way to manage proposal states.
Agencies can also use the system when they need more structure. The important question is not simply whether the software can automate. It is whether the team can control review, campaign focus, Upwork identity, proposal quality, and reporting.
- Good fit: Upwork freelancers with a clear service and recurring proposal workflow.
- Good fit: freelancers making around $1,000 or more per month who want acquisition leverage.
- Good fit: agencies that need campaign structure, review control, and reporting.
- Not ideal yet: freelancers with no offer, no proof, and no proposal basics.
Step 1: Create your account and install the Chrome extension
Start by creating your Leverage Proposals account from the website. The dashboard is where you create campaigns, review jobs, generate proposals, monitor status, and view reporting. The Chrome extension is the bridge that helps the product work with your Upwork session. Keep the extension connected to the same workspace you use in the dashboard.
After installation, confirm that the dashboard can see the extension status. The sidebar shows extension state, Connects, workspace information, campaigns, analytics, and the Upwork Report. If the extension is offline, fix that before relying on scans or submissions. The workflow is only useful when the browser, dashboard, and Upwork session are aligned.
This is also where account safety starts. Use your own Upwork account, keep your workspace token private, and do not share browser access casually. Leverage Proposals is designed for a controlled workflow, and the extension should be treated like part of your acquisition system.
- Create or sign in to your Leverage Proposals dashboard.
- Install the Chrome extension from the official listing.
- Connect the extension to your workspace.
- Confirm the dashboard shows extension status and Connects.
- Use the same browser profile where you are logged into Upwork.
Step 2: Create a focused campaign
A campaign is the operating unit inside Leverage Proposals. Do not create a campaign called 'all Upwork jobs.' Create one around a specific service, buyer type, or search strategy. For example: Webflow redesigns, Make automation, bookkeeping cleanup, SaaS landing pages, data dashboards, video editing retainers, or virtual assistant operations.
Use a filtered Upwork search URL instead of a broad feed. A filtered search helps the system bring in jobs that match your offer more closely. Your campaign context should explain what you do, which jobs are good fits, what proof you can use, and what jobs should be skipped. The better the campaign context, the better the scoring and drafts.
This is also where you choose the workflow style. Selective mode is the semi-automated system: Leverage Proposals helps discover, score, and draft, while you approve the important steps. Automatic mode is the fuller automation path for a campaign that already has strong rules. If you are unsure, start Selective. Once you understand which searches produce replies, you can decide whether more automation is appropriate.
- Name the campaign by service, not by vague ambition.
- Paste a filtered Upwork search URL.
- Add service focus and proof that the proposal writer can use.
- Choose Selective mode for semi-automated review.
- Use Automatic mode only after you trust the campaign rules.
Step 3: Review qualified jobs
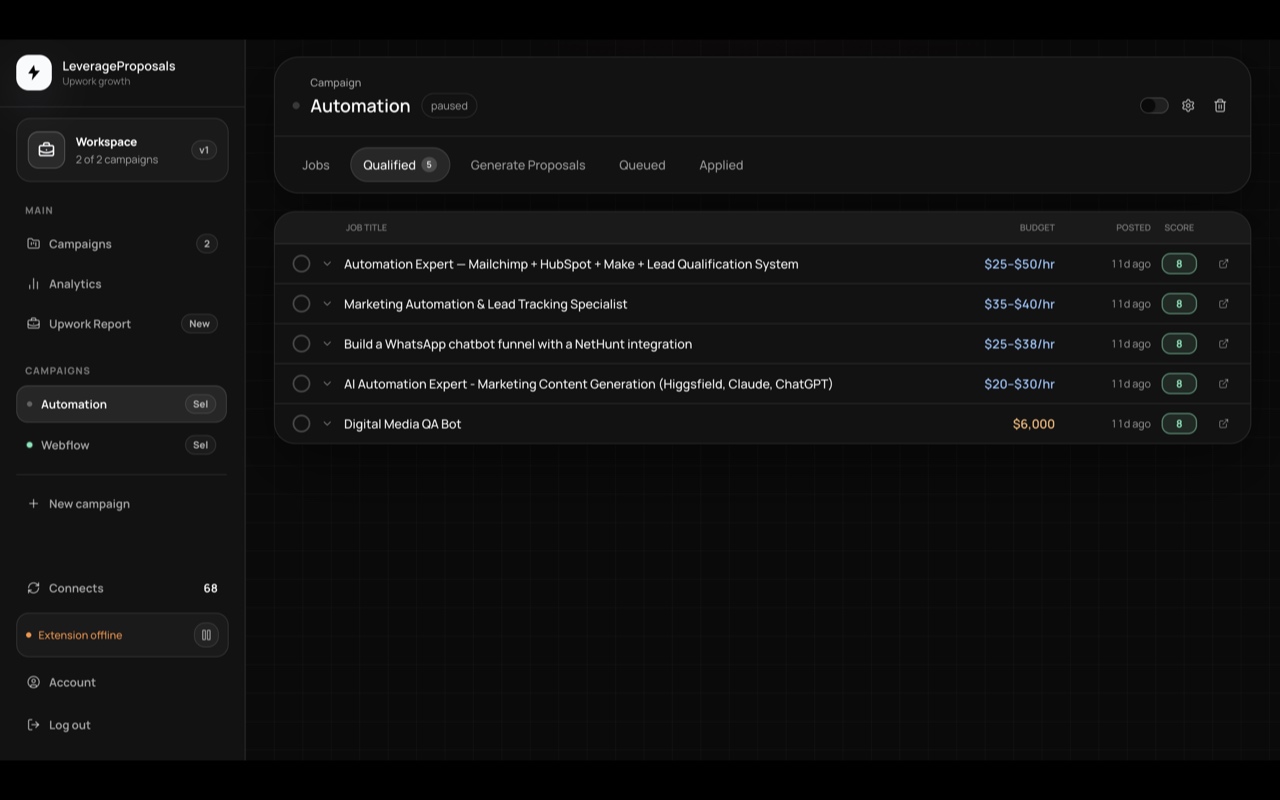
The Qualified tab is where the system starts to save you time. Instead of opening every job in the Upwork feed, you can review a focused list of jobs that match your campaign. Each row gives you the job title, budget, post timing, and score. The purpose is not to make you blindly trust a number. The purpose is to help you decide which opportunities deserve attention first.
Open the jobs that look relevant and compare them against your proof. Ask whether the client has a real problem, whether the budget makes sense, whether the job is fresh enough, and whether you can write a specific first line. If the answer is no, skip it. Skipping weak jobs is part of the workflow, not a failure.
This is where many freelancers recover the most time. Manual Upwork searching encourages browsing. Leverage Proposals encourages decision-making. The question becomes: apply, generate a proposal, save for later, or skip?
- Use scores to prioritize, not to replace judgment.
- Check budget, freshness, client context, and proposal count.
- Generate proposals only for jobs where your proof is obvious.
- Skip jobs that are vague, crowded, or outside your campaign focus.
Step 4: Generate and edit proposal drafts
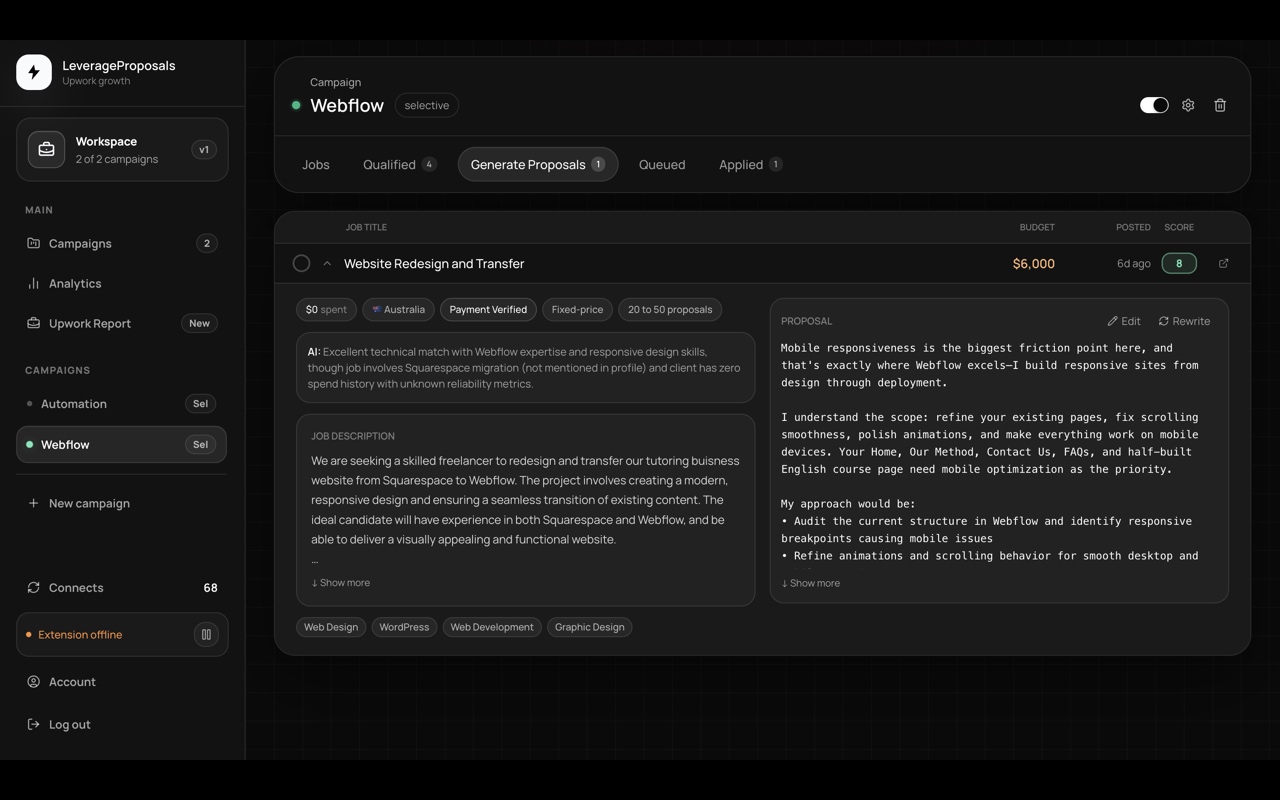
When a job is worth pursuing, use Generate Proposals to create a draft. The draft is not meant to remove you from the process. It is meant to remove the blank page. A good draft should connect the job description, your campaign focus, relevant proof, and a practical first step.
Review the first line before anything else. If the first line could fit ten different jobs, rewrite it. The client should feel that you noticed the actual problem in their post. Then check the proof. Do not let the proposal claim experience you do not have. Replace broad claims with one relevant example, process note, or portfolio reference.
The best proposal drafts are usually short. They acknowledge the client's situation, show fit, outline the first steps, and ask one useful question. The software helps you get there faster, but the final proposal should still sound like a thoughtful freelancer who understood the work.
- Edit the first line for the exact job.
- Replace generic proof with one relevant example.
- Keep the proposal short enough to scan.
- Use screening answers to reinforce fit, not repeat filler.
- Only queue or submit after the draft passes your review.
Step 5: Choose Selective or Automatic workflow
Leverage Proposals supports both semi-automated and more fully automated operating styles. Selective mode is the best place to start for most freelancers. In Selective mode, the system finds and scores jobs, but you decide which jobs get proposals. You generate drafts, edit them, and choose whether to queue or submit. This keeps quality high and helps you learn which jobs are actually worth it.
Automatic mode is for campaigns where the rules are already proven. If a search consistently produces strong jobs, your proof is clear, your proposal style is dialed in, and your Connects economics are healthy, more automation can make sense. The important thing is that Automatic mode should follow a strategy, not replace one.
A practical progression is simple: start Selective, review results, improve campaign context, track replies, then decide whether parts of the workflow deserve more automation. This makes the product useful today without forcing you into risk before the campaign is mature.
- Selective mode: semi-automated discovery, scoring, drafting, review, queueing, and submission decisions.
- Automatic mode: fuller automation for campaigns with proven search rules and proposal context.
- Use pause controls and reporting to keep visibility.
- Do not automate a campaign that you have not first reviewed manually.
Step 6: Understand statuses from job to applied
Leverage Proposals organizes proposal work into visible stages. Jobs begin in the feed, move into qualification, then into generated proposals, then queued or submitted states, and finally applied status after submission. This matters because the biggest hidden cost in Upwork work is losing track of what happened.
In a manual workflow, a freelancer might forget which jobs were promising, which proposals were sent, and which clients replied. A status-based workflow makes the pipeline visible. You can see what is waiting for review, what has a proposal draft, what is queued, and what has already been applied.
This is also useful for debugging and improvement. If jobs are qualified but not generating replies, the proposal angle may need work. If proposals are drafted but never sent, you may be reviewing too many weak jobs. If Connects spend is high but client value is low, the search rules need tightening.
- Jobs: incoming opportunities from your campaign source.
- Qualified: jobs worth reviewing based on fit signals.
- Generate Proposals: drafts ready for editing and decision.
- Queued: proposals prepared for submission workflow.
- Applied: submitted proposals and final status visibility.
Step 7: Use reports to understand acquisition health
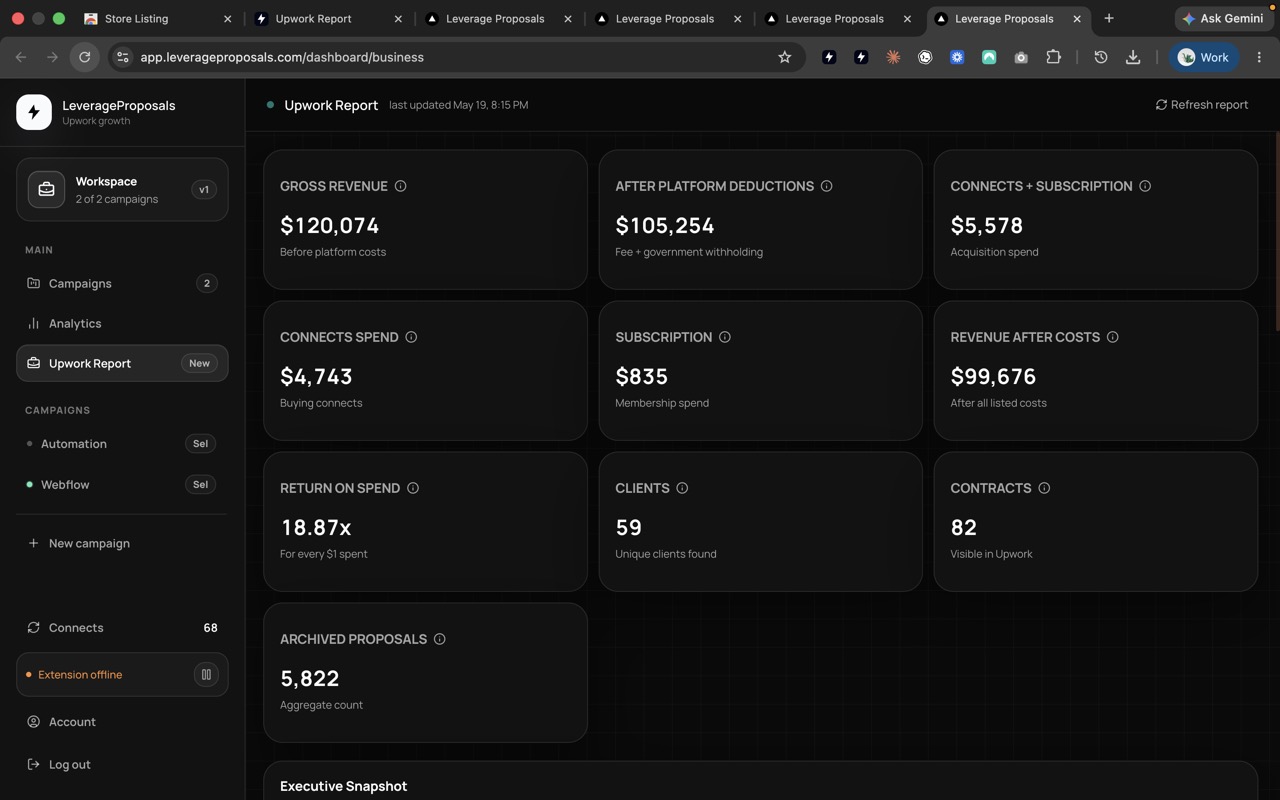
The Upwork Report is the business side of the workflow. Proposal automation only matters if the numbers make sense. The report helps you think about revenue, platform deductions, Connects spend, subscription spend, return on spend, clients, contracts, and archived proposals. The goal is to make acquisition feel measurable instead of emotional.
Use the report to answer business questions. How much are you spending to create opportunities? How many clients came from the activity? Is your proposal volume healthy or wasteful? Are you paying for Connects without enough client value? Is your workflow producing a return that justifies software, time, and Upwork acquisition cost?
This is especially useful for freelancers already making real money on Upwork. Once revenue exists, the next improvement is not always more proposals. Sometimes it is better targeting, better proof, better pricing, or fewer bad-fit applications.
- Review revenue after costs, not only gross revenue.
- Track Connects and subscription spend as acquisition cost.
- Compare clients, contracts, proposal volume, and return on spend.
- Use the numbers to decide whether to scale, pause, or tighten a campaign.
Main features explained
The main features work together as a system. Campaigns define the service and search strategy. The Chrome extension connects the dashboard to your browser and Upwork session. Job discovery brings opportunities into the dashboard. AI scoring helps prioritize review. Proposal generation removes the blank page. Selective mode keeps approval in your hands. Automatic mode supports stronger automation when a campaign is ready. Analytics and reports close the loop.
The most important feature is not any single button. It is the workflow discipline. A freelancer using Leverage Proposals well should become faster at saying no, faster at drafting good proposals, and more informed about which searches are worth attention.
The product is built for serious Upwork freelancers who want leverage without losing control. That means every feature should point back to a business question: is this job worth it, is this proposal specific, is this Connects spend rational, and is the system improving over time?
- Campaigns: organize acquisition around a focused service.
- Extension: connects browser-based Upwork workflow to the dashboard.
- Job scoring: prioritizes review by fit signals.
- Proposal drafts: create editable, context-aware proposals.
- Selective mode: semi-automated workflow with review control.
- Automatic mode: fuller automation for proven campaigns.
- Queue and status tracking: keeps work visible.
- Upwork Report: shows acquisition economics and ROI.
A practical daily routine
A simple daily routine is enough. Start by checking extension status and Connects. Open your campaign. Review qualified jobs. Skip weak jobs quickly. Generate drafts only for jobs that match your proof. Edit the first line and proof. Queue or submit the strongest proposals. At the end of the day, check what changed.
Once a week, review the numbers. Which campaign produced the best jobs? Which proposals got viewed? Which got replies? Which search terms created low-quality jobs? Which proof blocks seemed to help? This weekly review turns Leverage Proposals from a tool into a learning system.
Do not try to automate everything on day one. Use the product to understand your own acquisition process first. When the pattern is clear, increase automation carefully.
- Daily: review qualified jobs and draft only for strong-fit posts.
- Daily: edit first lines, proof, and screening answers.
- Daily: queue or submit only after review.
- Weekly: review reply rate, Connects spend, and campaign quality.
- Monthly: decide whether the system is paying for itself.
Best practices and mistakes to avoid
The best practice is to keep your campaigns narrow. A narrow campaign produces better scoring, better drafts, and cleaner reporting. If you sell Webflow redesigns, do not mix that with data entry, bookkeeping, and general admin work in one campaign. Each campaign should have its own proof, search terms, and proposal logic.
The biggest mistake is treating automation as permission to apply everywhere. Better software should make you more selective, not less. Upwork rewards relevance. If the proposal does not match the job, the client, and the proof, sending faster will not help.
Another mistake is ignoring economics. A proposal can be beautifully written and still be a bad business decision. Check budget, Connects cost, client quality, expected project value, and your current workload. Leverage Proposals gives you structure, but you still need to think like a business owner.
- Keep each campaign focused on one service or buyer type.
- Update campaign context when your offer changes.
- Review generated drafts before trusting them.
- Use Automatic mode only after Selective mode has proven the campaign.
- Track outcomes so your proposal strategy improves over time.
Get the Upwork automation safety checklist
Use it before deciding whether a campaign should stay Selective or move toward Automatic mode.
- Your campaign has clear skip rules.
- Your proof matches the job category.
- Your Connects spend is rational.
- Your reply rate is being tracked.
Questions and answers
Does Leverage Proposals fully automate Upwork proposals?
It supports both semi-automated and more fully automated workflows. Selective mode keeps review and approval in your hands. Automatic mode is for proven campaigns where you want more of the repetitive workflow handled by the system.
Should I start with Selective or Automatic mode?
Most freelancers should start with Selective mode. It lets you learn which jobs, scores, drafts, and proof work before increasing automation.
Who is Leverage Proposals best for?
It is best for Upwork freelancers and small agencies with a clear service, some proof, and recurring proposal activity. It is especially useful once Upwork is already producing around $1,000 or more per month.
Does the product replace proposal writing?
No. It helps draft and organize proposals, but strong freelancers still review the first line, proof, plan, and question before sending.
What should I track after using it?
Track qualified jobs, generated proposals, proposals sent, Connects spend, views, replies, interviews, clients, contract value, and return on spend.